
Navigating the outdoors with your canine friend demands reliable tracking. However, keeping track of your dogs, especially in outdoor environments, is vital for their safety and training. Many tech devices, like the Garmin Astro 430, are available for keeping the precision tracking of your dog. In this guide, we will embark on the journey of the Garmin Astro 430 setup. From the basic setup, you can easily view and track the whereabouts of your dog through this device.
What Will You Need For the Garmin Astro 430 Setup?
Before learning How To Use Garmin Astro 430 and set it up, you must have all the necessary items and software ready. These preparatory steps ensure a smooth, hassle-free, and quick configuration. Here is what you need before beginning with the setup:
- A Garmin Astro 430 handheld device
- A compatible Garmin dog collar
- Reliable internet connection
- Fully charged batteries
- A computer
- Garmin Express app
- An active Garmin account
- USB cable, etc.
Hence, having all these items at hand is the foundational step to the comprehensive configuration. Now, let us dive into the setup process.
How to Set Up the Garmin Astro 430 Handheld Device?
Once you have all the required things, you may start with its initial configuration. Through an effortless Garmin Astro 430 Setup, you can precisely communicate with your dog collar and navigate through. So, walk through these easy setup instructions step-by-step:
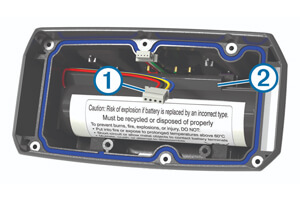
- Initially, charge the batteries properly and insert them into the Astro 430 and dog collar.
- After charging, you will see a solid green light on the collar.
- After that, turn on the handheld device by holding the power key.
- Now, your LCD screen turns off.
- Similarly, hold the power key on the dog collar and power it on.
- Next, ensure that both devices are receiving the satellite signals.
- You can also check this from the LED flashes (double or triple green blink).
- Now, adjust the backlight brightness on your device from the power and arrow keys.
- On the Astro 430 handheld device, go to the Main Menu>Dog List.
- Then, tap on “Add Dog” and bring both devices near.
- Further, choose “Yes” and follow the instructions to enter your dog name.
- Finally, select “Done” to complete the Garmin Astro 430 Setup.
Note: The above procedure is for the basic setup of your device. You can configure other settings such as track dog, create a map, view dog status, location alerts, and more.
Garmin Astro 430 Update: Enhance Performance and Fix Bugs!
Certainly, it is important to ensure your Garmin Astro 430 is running the most recent software. Moreover, these updates enhance functionality, optimize performance, and address issues, simplifying Garmin Astro 430 Troubleshooting. If you want to learn this procedure, have a look at the steps below:
- First, connect your handheld device to the computer using the USB cable.
- Now, ensure that your computer is connected to a reliable internet.
- Launch Garmin Express on your computer and tap “Get Started”.
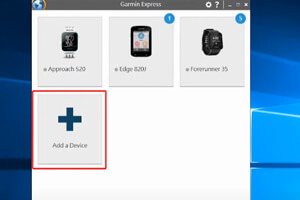
- Next, tap “+ Add Device” and select your Astro 430 handheld device.
- When your Garmin Express detects the handheld device, tap “Add this Device”.
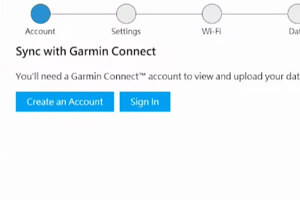
- Further, tap on “Sign in” or “Create an Account”.
- Then, enter your credentials and follow the on-screen instructions.
- Now, your Garmin Express will show the available updates.
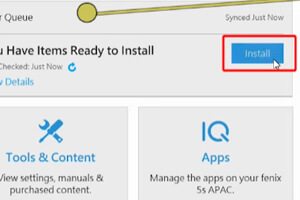
- Tap “Install” or “Install All” and accept the terms & conditions.
- Wait till the update is in progress.
- After that, let your computer reboot, and now it is running with the latest Garmin Astro 430 Update.
Bottom Line
In conclusion, Garmin Astro 430 Setup offers a promising way to dependable dog tracking. Most importantly, this allows you to ensure both your collar and handheld devices are prepared for peak performance. Consequently, you can enjoy every outdoor adventure more safely and confidently.